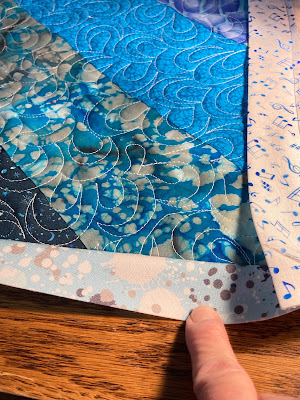
I got the blue chevron done. It finished 40 1/2" x 52".


It took a bit longer than usual to finish it since I took about a million pictures to show you how I sew on my binding with sewn mitered corners. It isn't hard; I just wanted to capture every detail of how I do this. I don't want it to be like the email I got today at work. We are having training virtual because of covid, but no details were give on what I was suppose to do to get this virtual training. That really pisses me off that they expect everyone just to "know". As I write this tutorial as if you out there to know anything about how to sew binding with a sewn mitered corner so therefor there will be lots of pictures and directions. It seems like a lot of work at first, but after you practice this technique a few times, the sewing goes much faster. I can now sew the corners in 15 minutes versus when I started I think it took me an hour and a half just to sew the corners the first time I did this.
The first thing is to sew the binding on each side of the quilt leaving a couple inches extra at both ends and sewing the binding a 1/4" short of the ends of the quilt top. If you use a different width of seam allowance, then that is the amount to short the seam. Read on; it will make sense. Hear I laid the binding on the quilt and the pencil points to where I am going to stop my stitching at the top. I am not concerned if it is exact at this point. I will show you how to fix that. For right now you just want to get the binding on all four sides.

Here I drew a line to show how I just eyeball a 1/4" short of the top edge.
Sew the binding and stop a 1/4" from the bottom of the edge of the quilt. Again I just eyeball it.
Turn the quilt a quarter turn counterclockwise so you can sew the next piece of binding on. I flip back the end of the binding already sewn on
Lay the next piece of binding at the edge of the quilt top and sticking over the top end by a couple inches. You see the pencil mark? I felt with my finger where the fold line was for the binding underneath and put a pencil line along that fold. When I go to sew this second piece of binding on I will stop at that line. This should get me pretty close to a 1/4" from the edge of the quilt top.
Here it is sewn
Sew that binding until you are 1/4" from the bottom edge.
Continue sewing the binding on the other two sides in the same manner. Next let's sew the miter. Here is what I am aiming for - see the dark blue thread and how the seam lines match up on the backside just perfect?
that doesn't happen all the time, but that's ok. Here is how I fix that. Here I have one seam that is too long.
I just pulled out the stitches that went past the 90 degree corner
I pulled the binding out of the way, flipped the quilt to the backside, and sewed the seam until it met the other seam line. I fix each corner as needed. I don't go and fix all four at once. I will fix a corner then sew the mitered corner, turn the quilt to the next corner, fix the seams if needed and then sew the mitered corner. This just saves from having to turn the quilt 8 times vs. four which makes for less work when it is a big quilt.
If your seam line is too short, just get the binding lined up out of the way, flip the quilt so the backside is facing up and stitch to the corner. Now we are ready to mark for the sewn miter corner. Lay the quilt so you are working at a bottom right corner position. It doesn't matter which corner you start with, you just be working on the corner in the bottom right position.
To mark the sewing line for the mitered corner I have a guide I bought over 30 years ago. I don't think they make them anymore.
Since you probably don't have one of those you can use a square cutting ruler with a 45 degree mark - a 6 or 8" will work fine along with a seam gauge or little ruler.
Lay the ruler on the binding with the diagonal line running the length of the binding and the edge touching the end of the seam that the arrow is pointing to.
Use the seam gauge to center the diagonal line. The distance from the folded edge of the binding to the diagonal line and the distance from the seam line to the diagonal line needs to be the same as shown by the orange lines.
Take a pencil and mark the point.
Take the bottom binding and put it face down with the batting and backing going away from you. I kind of rub the top of the quilt to flatten it a bit. The binding will have nothing under it.
Take the binding from the right side and fold it over the binding that is parallel to you. The quilt top will be at a 45 degree angle. You want to line up the folded edges of the binding.
Check underneath to make sure the bottom binding is nice and flat. Sometimes it isn't so just move the quilt a little left or right to get that bottom flat. This is what it should look like.
Hang in there! It is almost time to sew! Put a couple pins to hold the bindings together
I find it easier to sew this by getting a good grip on the edge of the binding and sliding it to the back of my sewing machine to slide the binding under the foot. There are a lot of layers and you need to make sure everything is going away from the binding when you sew. I hand crank some back stitches only stitching to the end of the seam line of the binding. When sewing I use tiny stitches because I trim the miter pretty close.
Here it is all sewn and trimmed.
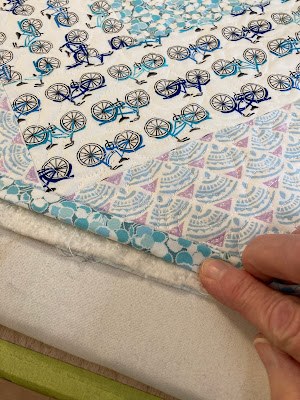
Now sew the other three corners. After I get all the corners sewn, it is time to trim the quilt. I take the quilt over to my pressing area. I fold the binding down once, then again then fold it over the batting. I then make a mark with a pen. I do this so I know where I need to cut to get the right amount of batting to fill the binding.
I use a seam gauge to measure the distance between the folded edge of the binding to the pen mark. I will use this to trim around the quilt.
After trimming I press the binding to make a nice clean edge.
I get the iron into the corners, use my hand dandy pointy thing and turn the corners inside out.
Now doesn't that make a nice mitered corner?
We are into the home stretch! I get my left hand quilting glove and a seam ripper. The glove gives me better grip and the ripper helps guide the fabric as I sew it.
I set my machine on stitch 15 and stitch all the way around in one shot.
I like the looks of the staggered zig zag instead of a straight stitch, but you can do whatever you like. And that is how it is done! Let me know if you have any questions.


3 comments:
Great tutorial!
Wonderful tutorial. You have quile a new stockpile of baby quilts!
I can't believe I've never seen this method for binding! I've GOT to try it on my next crib quilt. Thank you for doing all the work for the tutorial. Your pictures and details are so descriptive. Interesting... I happen to have the right tools for it. I have a different binding tool, but it has the same angles.
Hope you got your virtual training done. It's frustrating when schools and employers tell you what needs done and then don't give you the right details to do it properly. Ugh.
Still watching the forecast and hoping for a couple more snow days this year. But then I think about people like you that I don't want to have to go out and do all that shoveling by hand. Okay... Hoping my school district gets snowed in. We have food, sewing supplies, and toilet paper. We have the equipment running to clean out the snow from our driveway and the elderly neighbors. We have a very rural school district. Dump the snow here.
Post a Comment