So here is how I trim the chevron quilts. First I get out both my big rotary cutting mats and lay them side by side.
Next lay out the quilt top. I like to cut the long sides first.
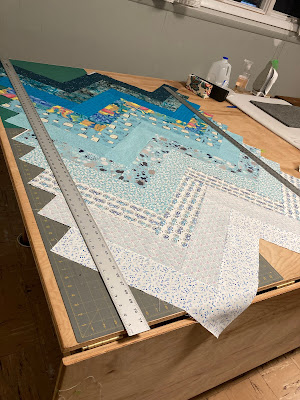
I get my long metal rulers and put the 6' one on the side of the quilt that has the mat underneath it and the 5' ruler on the other side. I bought these rulers at a big box store and they are great to have on hand! They were less than $20 each and worth every penny! They are 2" wide and thick enough to use as a cutting guide with a rotary cutter.
To get a general idea of where to put the rulers, I lay my backing out to see if it is wide enough or not. I ended up moving my rulers in toward the middle a little bit more to make sure I had enough backing width.
I use a sewing gauge and line up the 6' ruler by measuring the distance from the inside points to the edge of the ruler. I did the same thing to the other side.
Once you get the 6' ruler lined up then take a brick and put it at each end of the ruler so it doesn't move. The bricks also help hold the ruler in place when you go to rotary cut the edge. I have used covered bricks as an extra pair of hands in my sewing room for decades. I worked at a place that made custom drapes and that is where I first used covered bricks to help hold fabric in place when we needed to straighten out mass quantities of fabric.
Next I take a yardstick and place it perpendicular to the metal rulers to measure the distance between the 6' and 5' rulers. I move the 5' ruler until I get the same measurement at both ends.
I take a marker and draw a line at the 5' ruler that is not on a cutting mat. I then cut this side with scissors.
I go back to the 6' side and cut it with a rotary cutter.
Now it is time to cut the ends. I lay one end over the cutting mats and lay a ruler on it so the ruler touches the inner points.
Put at brick at one end of the ruler. Get the biggest square ruler you have and lay that on top of the quilt along the edge of the ruler. The idea is to make sure the metal ruler is squared up and the plastic square ruler gives you a longer edge to line everything up. Move the metal ruler and square ruler together like they are one unit. Sometimes you will need to straighten out the quilt a bit to get the square ruler lined up.
Once you are happy with the first side, put another brick at the other end of the metal ruler, move the square ruler to the other side to make sure that side is squared up.
Once you are happy with the ruler placement and the squared up sides, rotary cut off the fabric.
Flip the quilt to the other end and do the same thing to trim it off.
You need to be careful handling the top now since those cut edges are now bias edges. This top ended up 40.5" x 52".
It is now ready for me to pin baste.
With making these chevron quilts there are scraps!
Last weekend I took the scraps from the four green chevron quilts I recently made and started making quilts out of them. Here is the first one which is finish number 5 for 2022. I did have to take some of the scraps apart and sew them into the size I needed to make the blocks.
I still have all the triangles to make into usable HST pieces and a pile of rectangular pieces that I plan on sewing into blocks for a zig zag quilt. Let me know if you have any questions!


6 comments:
Wow...what a nice tutorial for us!!! Clever on using the covered bricks! What a great tip!!! And kudo's to you for 'waste not, want not' using the scraps! You are still my idol!
Oh my gosh, I can't keep up with all of your finishes this month!
You are a dynamo. Thanks for the photos and explanation.
LOVE what you did with the scraps! The backing fabric on the mini is fantastic too. Woohoo for five finishes already this year.
I'm way behind you with only one finish this year. AND I don't have a full time job to take time away from quiltmaking.
Wow, I really appreciated all the photos and detailed explanations! I’m still picking out my fabrics. Who knew I needed covered bricks? I have a meat pounder I use to weight things down but a covered brick is a much better tool for this kind of job. I love your quilt made from the scraps.
Post a Comment