The multi colored chevron quilt that my friend designed is now done. It is 40 1/2" x 49". I ended up using three different varigated threads to quilt it. I used orange thread for the back. I also used scraps to make a multi colored binding.
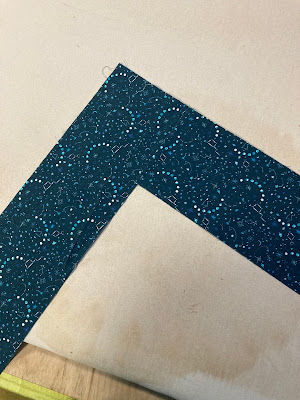
Did you get your pieces cut for the chevron quilt? Good for you so let's get started on sewing the top together! Before you start sewing you first need to make two tick marks to make sure you sew the pieces together correctly once the two halves of the quilt are ready. Here at the top of the quilt I put a tick marks to make sure I join it together correctly. I learned this the hard way! You put these marks at the top because you will sew together the partial seams from the top down even though you sew the two halves of the quilt from the bottom up.
This quilt is constructed in halves. I always start out with the left half, no reason, it is just what I have gotten in the habit of doing. For this quilt again, you construct the halves from the bottom up and when you sew the partial seams to sew the two halves together, you sew from the top down. Get the first two pieces at the bottom of the left side
Make sure they are positioned correctly and sew them together. I press the seam toward the right piece.
Get the next two pieces. For the right piece you will sew from the tip until you are about 3 or 4 inches from the end of the fabric. This is your partial seam that will be sewn when you sew the halves of the quilt together.
Press the piece toward the new piece you added, but only press the seam to within a couple inches of where you stopped the seam line. It is just easier to sew the partial seams if they are not pressed.
Layout the left piece and sew the seam the entire length of the piece. The left side is the outside edge of the quilt top. Press the seam toward the new piece.
Just continue adding your pieces remembering the pieces on the right need to be partial seams and the pieces on the left are full seams.
When you get to the last row, make sure your tick mark is in the right spot.
Here is the back pressed
and here is the left side on the design wall all sewn together. The yellow squiggly line indicates the partial seams.
Now let's sew together the right side. The first row you sew together the same as the left side.
The second row is different. Sew the right piece on the entire length of the piece. The left piece you need to start sewing 3 to 4 inches from the bottom to the top to make that partial seam. This construction is the opposite of the left half of the quilt.
Continue sewing the rows together and when you hang the right side of the quilt up, all the partial seams need to be in the center.
I still have half of my right side yet to sew together which won't take too long. Tomorrow I will show how to sew the two halves together. I would love to see your progress. Just email me at pattynubs at gmail dot com and let me know if I can post your pictures. I will just use first initials when giving credit. Also, let me know if you have any questions or if something isn't clear.


1 comment:
Excellent instructions! I will start one of these soon. We've had an unusual amount of visitors lately that has kept me out of the sewing room.
Post a Comment