I don't know what kind of flowers/bulbs these are, but I forget every year that I have them and it is always a nice suprise when I see them in the spring. They bloom right after the daffodils are done.

Lenten roses

I thought I would show how I make the improv blocks for the Halloween quilt. I love making these blocks. I start out by layering two pieces of fabric both right side up. I press them so they are nice and smooth together. I like big blocks so I cut 16" strips of fabric selvege to selvege and then cut those in half. You could cut any size you want, but just make sure you allow enough in the width for seam allowances.

Once I have the two layers stacked I trim with a straight edge the top of the fabric. This will help you line up the pieces when sewing them together.

Now it is time to cut the stripes. Here is where you can play - fat strips, skinny strips, straighter strips, curvey strips - what ever you want! You could even use a ruler to make your cuts if you don't want to improv the cutting. Me, I just get in there and cut away free style! Once you make a cut, pull that section away a bit so you can see where you cut and you can see easier where you need to make your next cut.

Second cut

And now the strips are all cut. I stack the strips from left to right to move them to the sewing machine then I unstack them and sort them.

I sorted out the pieces and now they are ready to sew together. The trimmed side is at the top. Sew the stripes together from left to right that way you have the straight edge to match up the pieces and the bulk of the block will be to the left.

Here are the finished blocks. See how they are fairly straight at the top? That is because I did that trimming. I pressed the seam allowances to one side (I am old school).


Here is where I am at right now. I was asked "What happened to the zig zag pieces?" Well, I played around this morning before I went to work and I think I have figured out how I am going to incorporate them. You will just have to wait and see! I did get four more blocks done last evening.

I am running out of different Halloween prints so I dug into the stash and pulled these out. I know they do not look like Halloween fabric, but if you look at the close up picture you can see the tiny witches, pumpkins, stars, and bats. I bought this at least 5 years ago and only paid a couple of dollars a yard so I bought everything they had. I know of the blue and gray there were at least 10 to 12 yards pieces.

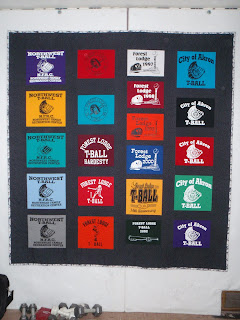
I had used the gray for the sashing on this baseball t-shirt quilt

and I used a lot of the blue when my friend, Kris, and I made this queen sized quilt for her daughter and I still had lots of this Halloween fabric left!

The witches are only 5/8" tall and the pumpkins are maybe 3/8". I plan on using the gray for the binding and maybe a mix of the fabrics for the back.

I may pick up a few more Halloween prints when I go to Charm, Ohio to work at Miller's Dry Goods quilt shop this Friday and Saturday for their anniversary sale. It will be fun to see the girls and pick up some fabric at 30% off.

3 comments:
Oh, aim so glad to hear my friends the Zigs will be coming back into play!
Thank for the mini-tute!!
Your garden is beautiful and the Halloween quilt is looking great!
Patty, thanks for showing how you did the improv Halloween blocks, I'm glad I found it.... now lets see if I can do it also...
Post a Comment