Friday, April 29, 2011
Babies and quilts
I love when I get a picture of a baby on a quilt of mine. This is Sabina.
I am putting together my process tutorial for free motion quilting for Monday's post. I was going to do that today, but there are some pictures I would like to include that I need to take.
This weekend will be alterations and quilting the aqua improv quilt. I may go and see my nephew's band play on Saturday. They only play for an hour, but I know my brother will need help packing up all the gear. It takes him several hours to get all the equipment set up. Hardly worth it for only an hour show, but the exposure is alway important.
Have a great weekend.
Thursday, April 28, 2011
Earth, wind and fabric
I had to go the the dentist for a cleaning yesterday in my home town an hour away from where I live. Since I was there I stopped at The Material Girl quilt shop to sign up for the bus trip to NQA in Columbus, Ohio June 17th and of course look around. I found this Marcus Brothers Itty Bitty Bella for $3.99 a yard. I had some in the pink, but not in the blue. I did restrain myself and did not buy all of it.
Here are three suits a neighbor brought me that need the skirts shortened. I also have to take in one of the jackets. That will be a project for the weekend and add to my fun money for Columbus.
The wind is starting to died down a bit. Thank goodness it didn't start until late yesterday so my trip back to Akron after the dentist was an easy one. There were some traffic lights out on my way to work this morning, but people were actually behaving themselves and stopping at the intersections!
Wednesday, April 27, 2011
Scrap smackdown
We finally had a dry day so I finally got to mow my yard last evening. I didn't get the back mowed - it is still too wet and I have a lot of sticks to pick up. I left the weed wacking for another day also.
Here is the gathering of all my scraps. I sorted a bunch by color into grocery bags a while ago when I was babysitting my nephews. We had a copy paper delivery at work so I took all the boxes and will now sort my scraps into those boxes. It will be easier to hit the box rather than a slouchy bag.
I found this two units as I dug thru the scraps to find the novelty prints for the I Spy quilts. I don't remember making these. Maybe they were in my Mom's scraps. I like them and I think it will be a good way to use up the scraps that can't be used for the scrap zig zag blocks.
Sounds like a scrap smackdown plan doesn't it?
Tuesday, April 26, 2011
Finally done
I thought it would be fun to participate in an on-line group project - I was wrong. All it did was stress me out. I wracked my brain for months on how to make my part of the project. This is the finished piece and I am just glad it is done. It is the best I could come up with under duress.
I put in the mail this morning and I have to hope that it gets to its destination by 5/3.
Monday, April 25, 2011
I Spy quilts
Friday, April 22, 2011
Paula Nadelstern show
Here is the card for the Paula Nadelstern shown at the Akron Art Museum. I attended a meeting yesterday at the museum for brainstorming the people to target for this show. The opening party is June 17 and Paula will be attending the opening. With cupcakes, cordials, and coffee it sounds like it will be a wonderful, fun opening! Visit www.AkronArtMuseum.org for more info.
I am glad the weekend is here. I have a long list in my head of what I would like to get done and will only happen if I clone myself and don't sleep. The Improv baby quilt, staining and varnishing a coffe table, cleaning the laundry/utility/dye studio, cleanin out the garage, working on the scraps, and mowing the grass are on the list.
Saturday my nephew, The Michael Weber Show (his solo project), is playing along with Nikki Storm & Friends, and Straw Monkey. Michael will also be playing with Nikki Storm. This event runs from 3 - 7. I have to get those velcro straps sewn together so I can hand them off to Michael's dad and I am putting together a First Aid kit for Michael's other band, Retro. By the way Michael is 13 years old. You can go to the websites www.themichaelwebershow.com and see him in action or the Retro website which is www.retroclassicrock.com. Have a great weekend.
Thursday, April 21, 2011
Where have I been this week?
I have been in a blue funk all week. That's what my grandmother use to call it.
Here are the rest of my bins of scraps I had planned on dealing with before the Improv quilt came along and messed up my schedule. I am going to try and sort thru as much of this as possible over Easter. We work on Friday, but usually get to go home a couple hours earlier. Let's just hope that there are some light background novelty fabrics for the I Spy quilts.
Monday, April 18, 2011
Scrap-a-thon
Saturday I decided to work on going thru my scraps. Here is the before of one box.
I got sidetracked from the scrap box when I found some fabrics I could use to make some I Spy quilts. Here is one quilt up on the design wall. I then decided to go thru my stash to see what I could find. I found a number of fruits, vegtable, and music fabrics to add to the quilt. I need to keep going thru my scraps to find more light colored novelty prints that would work. I wanted to make a kind of checkerboard look - the medium fabrics are throwing it off a bit, but heck it just a play type quilt. I have two or three more boxes of scraps I need to go thru to try and find more prints. I cut blocks for three I Spy quilts, but this morning I got to thinking and I should have cut enough for four.
Here are some strips from scraps that I will sew to Kona snow strips and cut 5 1/2" blocks for making zig zag quilts.
Here is the after picture. I worked long and hard on Saturday and it just doesn't look like I accomplished much. It just takes longer than you would think dealing with scraps and cutting for three small quilts.
I was out of town all day Sunday. I didn't get home until 6:30 p.m. and I was beat. I did a load of laundry, had something to eat, relaxed a bit, and went to bead early.
Thursday, April 14, 2011
The process - Tutorial 4
It has been a few day since I have posted. The car now has a new battery and air filter, and the oil has been changed. The service men were looking at my PM maintenance and notice that I have not had my timing belt changed. I guess that needs to be done so that is scheduled for next week - $500.00 it will cost. Tuesday I spent all day on my feet wearing the wrong shoes. It was an out of the blue thing so I didn't know I was going to be on my feet all day. I went home and I hurt from my chin to my feet. Wednesday was another day that I was on my feet all day, but I wore my Timberland boots so even though I was still tired at least my whole body wasn't hurting. I altered a jacket last night and went to bed early. So that's my story.
This is where the last tutorial left off. I had the scrap backing from the t-shirt quilt. I pieced together some of the scraps and fabric left over to join the backing together to make the back big enough.
Here is the back completed.
Here is the tape I use for taping my quilt backs down (I also use it to hem my pants that I don't get around to shorting). It is 3M's Green Painter's tape. The green tape is sticker than the blue tape. When it is more humid in the summer the blue tape just doesn't stick to the fabric well.
I started taping the back down at the short end that had the piecing. I put a piece of tape on each seam then I went to the opposite side and taped. I went back to the side I started and put another piece between the first two and then worked my way out to the sides. I went back to the opposite side and repeated.
This is the back before I start taping the sides. Looks pretty bad don't you think? No problem. After I finished taping the short ends I started in the middle and taped one side down and then the opposite side. My technique is to stick the tape to the fabric and gently pull the fabric, release the fabric then find a nice inbetween tension to put on the fabric. If you pull the fabric too much it will spring back after your done pin basting and the top of the quilt will be wrinkled. If you don't pull it enough, you may end up with wrinkles on the back and those wrinkles would get quilted into the back. I just watch the fabric see how far I can work it. After I have the back taped down I go back and look again to see if I need to adjust any places where I pulled too hard or not hard enough. I usually end up with the tape about a fist apart from each other along the sides and as close as I need them any place else.
Here is the back all taped down. See how the big wrinkles are gone?
Next lay the batting (this is 80/20 warm and natural) and smooth it with my trusty worn wooden yardstick. Again, I am just smoothing and not over stretching the batting.
After I placed the quilt top on the batting layer, I carefully smooth the quilt top with the yard stick. After smoothing I very lightly press the quilt moving the iron ever so lightly from the center to the edges. If I am doing a extra special quilt I will get the tape measure out and make sure every thing is squared up. This is the last chance you have to manipulate the top to get the size right.
The top is now ready to be pin basted. I ususally space my pins about a fist apart. I use an old seam ripper to help close the pins. I use safety pins that are straight and not the curved ones. I bought my in bulk bags from a company call Homesew in Pennsylvania. There are 144 per bag and over the years I have probably bought at least ten bags.
Here is how I pin baste the area outside the quilt top. I find pin basting the batting and backing together prevents the problem of the backing folding under and it getting quilted by mistake. Yes, I have done that before and it is a pain to fix.
After pulling off the green tape I trim the sides if it is needed. I usually leave about 2" of batting and backing extending beyond the quilt top. This gives me something to hold onto when doing the quilting. If there is too much backing and batting it just gets in the way.
Here is what the back looks like pin basted.
Next tutorial is free motion quilting. After quilting it is on to the binding. >
Monday, April 11, 2011
Busy weekend
I don't have time to post the next phase of the aqua improv quilt, but here is the t-shirt quilt pin basted.
Saturday I worked in the sewing studio all day. I had one visitor bringing me a lined jacket to hem the sleeves, but other than that it was nice and quiet.
Sunday I decided I had to clean up the house. There was stuff accumilating on the floor of the sewing studio and I was tired of walking around it. I started in the fabric storage room closet and worked my way thru the room and then tackeled the stuff on the floor. It is so much better! It was pretty warm so I had all the windows open and there was a very strong breeze. It also was quite humid. I got the kitchen cleaned up too.
This morning I went to start the car and nothing. Had to call AAA for a jump and the man said I needed a new battery. We got car started so at lunch I took it to the shop - thank goodness it started again. I will pick it up after work. I also needed an oil change and they said my third light was out so I am killing several birds with one stone. There goes all my fun money!
Friday, April 8, 2011
The process - Tutitorial part 3
Before I get started on the tutitorial I thought I would show how close my daffodils are to opening. It is overcast, 43 degree, and raining today so I don't think they will be opening today. It has been a long winter and I am ready for some color in the yard.
Here is the completed quilt top. Now I am ready to trim it to size. What size? The size it comes out to be. I made sure that the top looked proportional in size - meaning the lenght of the top and the width look good together - that it wasn't too skinny or short in relation to the lenght or width. That is why I added the scrappy pieced area - the quilt would have come out sort of square instead of rectangular which is what I was aiming for.
I folded the top in half - putting the shorter sides together. I made sure I smoothed the top, flipped it over and smoothed out the other side. You don't want any big wrinkles! I took my ruler and found the shortest measurement from the fold to the edge. I took that measurement and put a mark at each end. This is where I lined up the ruler for my first cut.
Here I have the top ready for my first trimming cut. You can see that with the long ruler I can cut in one swipe. Read on for the details about this ruler. The ruler is held with my extra hands - bricks wrapped in batting and leftover fabric. I used drapery fabric because it is heavier and I had it laying around.
I turned the top and cut the sides next. I layed my 60" ruler down as close the the edge as possible then laid my large square plastic ruler at the fold and used it as a guide to make sure I was squared up with the folded edge. I held the two rulers together using them like one unit. I also had checked before I cut that I could just see the eddge of the underneath side of the top. Again I used my handy dandy covered bricks to hold the ruler at each end while I cut. I repeated this procedure and trimmed the other side.
Here you can see the name of the company, Johnson Level and Tool Mfg. I do not have any endorsement deal with them or the Home Depot which is where I bought this 60" ruler. All I can say was that it was one of those tools I don't know how I ever lived without it.
You can see here the thickness of this ruler which makes it ideal for a straight edge cutting tool.
I am going to use the leftover backing from the baseball t-shirt quilt that I had cut off before I stamped the backing. It is not quite enought so I cut the backing so that I have a piece that is the full width (shown here under the quilt top which is still folded in half) and the other piece (sitting on top of the quilt top) which is short of covering the back. I will use leftover scraps and yardage of the fabrics I used on the quilt top to make the backing big enough.
Other projects this weekend are lenghting the sleeves on a lined jacket, moving the sleeves of another jacket to take out excess fabric across the back between the sleeves, pin basting the baseball t-shirt quilt, and cleaning out the garage if the weather is warm enough.
Thursday, April 7, 2011
I love linen
Here are two pieces of linen I just bought thru ebay. The wide stripe is 3 yards and the other piece is 1 yard. I want to make more linen quilts and I think these fabrics will add an interesting touch.
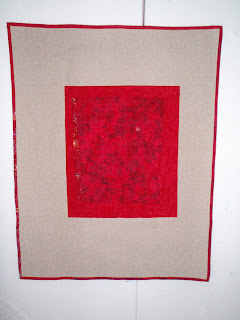
I made this quilt last year with linen and batiks. The beige is the linen and the reds are batiks.
The back is regular cotton backing with the batik accents. I quilted the red batik with red on both sides and it give a shadow effect on the back.
I made this quilt last year with linen and batiks. The beige is the linen and the reds are batiks.
The back is regular cotton backing with the batik accents. I quilted the red batik with red on both sides and it give a shadow effect on the back.
Wednesday, April 6, 2011
Tops or quilts needed
I know there is a lot of need out there these days for organizations looking for donations. It pains me that I haven't been able to donate to everyone. Here is a cause I found yesterday that I think is wonderful. Margaret's Hope Chest is celebrating giving away their 1000th quilt to children of a parent that is in prison. This is a top that I am going to send. You can read more at http://margaretshopechest.blogspot.com. Sorry I don't know how to link directly to the site.
Tuesday, April 5, 2011
Stamped and stenciled
I finished stamping and stenciling the backing for the baseball t-shirt. The baseballs are stamped with fabric paint and the bats and gloves are stenciled with ink. It didn't take very long at all. I didn't want to do anything to fancy since it is probably going to be hung, but I didn't want the back to be plain either. I will press the backing again just to heat set the images and then it is on to pin basting and quilting.
Monday, April 4, 2011
The process - tutorial part 2
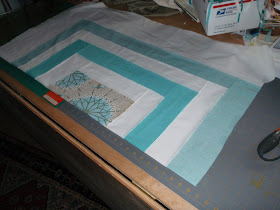
Since Friday where we left off from this tutorial, I added the two rows of logs and decided to add another round of white rather than ending with the striped fabric on the outside. I sewed on the first two logs (I had cut the fabric wide - about 6"), but then the block was getting so big that the white kona strip would not be long enough on the third side. AH! A design opportunity! I just cut the kona strip and inserted a piece of the center fabric. I only put the white on three sides. I was figuring that once I cut the block into quarters that I didn't want to have a lot of extra white between the quarters to cut off.
Here I took the block and folded roughly in half. I used the edges of the center piece as my guide. Since my outside border is only on three sides I don't want to use that as a guide for folding the block. After folding I finger pressed the fold. This will give me a glide line for slicing the block. I am not concerned that I cut perfectly on this line. I just wanted a guide so that I end with the block cut into four similar sized pieces.
Here you can just see the finger pressed line that I will use as a guide for cutting the block in half.
The block cut in half.
One of the halves folded in half and I finger pressed a line as a guide for cutting.
Here is one of the two halves sliced into two pieces. Next let's put them on the design wall.
The blocks arranged on the wall. I really didn't have to fuss too much with this step. I like pretty much where I had put them the first time. I only changed how far the blocks were from each other. I did change the orientation of the blocks 90 degrees in the next picture.
I added some of the scraps at the bottom. The piece was measuring about 40" wide by 43" long. I didn't want a square quilt. I sewed together the scraps and sewed them to the bottom of the lower blocks.
Here you can see that I will need to add some fabric to the left side of the upper right block in order to place the block where I want it. This is just what happens in this type of piecing. It was not unexpected - just part of the process.
After I sewed a piece of kona to the left side of the upper block I layed it back up on the wall. In order to know where to cut the fabric for joining the lower block to the upper block when moving the blocks from the wall to the cutting table, I used a blue water soluable maker to make some tick marks. Otherwise I would be a real guess for placement. Here you can see the marks I made. I moved the upper block 1/2" away from the blue markings to add for seam allowance. I cut the fabric at the edge of the upper block and just removed the extra white fabric on the lower block.
The last seam will be joining the left and right sections together. After that I will go ahead and square it up then I will be ready to show how I get the quilt ready for quilting.